A Better Approach to Google Cloud Continuous Deployment
Most continuous deployment (CD) systems test code before rolling it out—but there’s a better way. Learn how to use Kubernetes to build an easily extendable event-driven CD pipeline that is optimized for reliable test results.
Most continuous deployment (CD) systems test code before rolling it out—but there’s a better way. Learn how to use Kubernetes to build an easily extendable event-driven CD pipeline that is optimized for reliable test results.

Antoine is a software developer with more than 18 years of experience at companies such as Meta and Ubisoft. He has deep expertise in Linux systems administration, DevOps, and Python, and has developed CI/CD pipelines for several organizations.
Expertise
PREVIOUSLY AT

Continuous deployment (CD) is the practice of automatically deploying new code to production. Most continuous deployment systems validate that the code to be deployed is viable by running unit and functional tests, and if everything looks good, the deployment rolls out. The rollout itself usually happens in stages in order to be able to rollback if the code doesn’t behave as expected.
There’s no shortage of blog posts about how to implement your own CD pipeline using various tools like the AWS stack, Google Cloud stack, Bitbucket pipeline, etc. But I find that most of them don’t fit my idea of what a good CD pipeline should look like: one that builds first, and tests and deploys only that single built file.
In this article, I’m going to build an event-driven continuous deployment pipeline that builds first and then runs tests on our deployment final artifact. This not only makes our test results more reliable, but also makes the CD pipeline easily extendable. It would look something like this:
- A commit is made to our source repository.
- This triggers a build of the associated image.
- Tests are run on the built artifact.
- If everything looks good, the image is deployed to production.
This article assumes atleast a passing familiarity with Kubernetes and container technology, but if you’re unfamiliar or could use a refresher, see What Is Kubernetes? A Guide to Containerization and Deployment.
The problem with Most CD Setups
Here’s my problem with most CD pipelines: They usually do everything in the build file. Most blog posts I’ve read about this will have some variation of the following sequence in whatever build file they have (cloudbuild.yaml for Google Cloud Build, bitbucket-pipeline.yaml for Bitbucket).
- Run tests
- Build image
- Push image to container repo
- Update environment with new image
You’re not running your tests on your final artifact.
By doing things in this order, you run your tests. If they are successful, you build the image and go on with the rest of the pipeline. What happens if the build process changed your image in such a way that the tests wouldn’t pass anymore? In my opinion, you should start by producing an artifact (the final container image) and this artifact shouldn’t change between build and the time it is deployed to production. This ensures that the data you have about said artifact (test results, size, etc) is always valid.
Your build environment has the “keys to the kingdom.”
By using your build environment to deploy your image to your production stack, you are effectively allowing it to change your production environment. I view this as a very bad thing because anyone with write access to your source repository can now do anything they want to your production environment.
You have to rerun the whole pipeline if the last step failed.
If the last step fails (for instance, because of a credential problem) you have to rerun your whole pipeline, taking up time and other resources that could be better spent doing something else.
This leads me to my final point:
Your steps are not independent.
In a more general sense, having independent steps allows you to have more flexibility in your pipeline. Let’s say you want to add functional tests to your pipeline. By having your steps in one build file, you need to have your build environment spin up a functional test environment and run the tests in it (most likely sequentially). If your steps were independant, you could have both your unit tests and functional tests started by the “image built” event. They would then run in parallel in their own environment.
My Ideal CD Setup
In my opinion, a better way to approach this problem would be to have a series of independent steps all linked together by an event mechanism.
This has several advantages compared to the previous method:
You can take several independent actions on different events.
As stated above, the successful building of a new image would just publish a “successful build” event. In turn, we can have several things run when this event is triggered. In our case, we would start the unit and functional tests. You can also think of things like alerting the developer when a build failed event is triggered or if tests don’t pass.
Each environment has its own set of rights.
By having each step happen in its own environment, we remove the need for a single environment to have all the rights. Now the build environment can only build, the test environment can only test, and the deployment environment can only deploy. This allows you to be confident that, once your image has been built, it won’t change. The artifact that was produced is the one that will end up in your production stack. It also allows for easier auditing of which step of your pipeline is doing what as you can link one set of credentials to one step.
There is more flexibility.
Want to send an email to someone on each successful build? Just add something that reacts to that event and sends an email. It’s easy—you don’t have to change your build code and you don’t have to hardcode someone’s email in your source repository.
Retries are easier.
Having independent steps also means that you don’t have to restart the whole pipeline if one step fails. If the fail condition is temporary or has been fixed manually, you can just retry the step that failed. This allows for a more efficient pipeline. When a build step takes several minutes, it’s good to not have to rebuild the image just because you forgot to give your deploy environment write access to your cluster.
Implementing Google Cloud Continuous Deployment
Google Cloud Platform has all the tools necessary to build such a system in a short amount of time and with very little code.
Our test application is a simple Flask application that just serves a piece of static text. This application is deployed to a Kubernetes cluster that serves it to the broader internet.
I will be implementing a simplified version of the pipeline I introduced earlier. I basically removed the test steps so it now looks like this:
- A new commit is made to the source repository
- This triggers an image build. If successful, it is pushed to the container repository and an event is published to a Pub/Sub topic
- A small script is subscribed to that subject and checks the parameters of the image—if they match what we asked for, it is deployed to the Kubernetes cluster.
Here is a graphical representation of our pipeline.
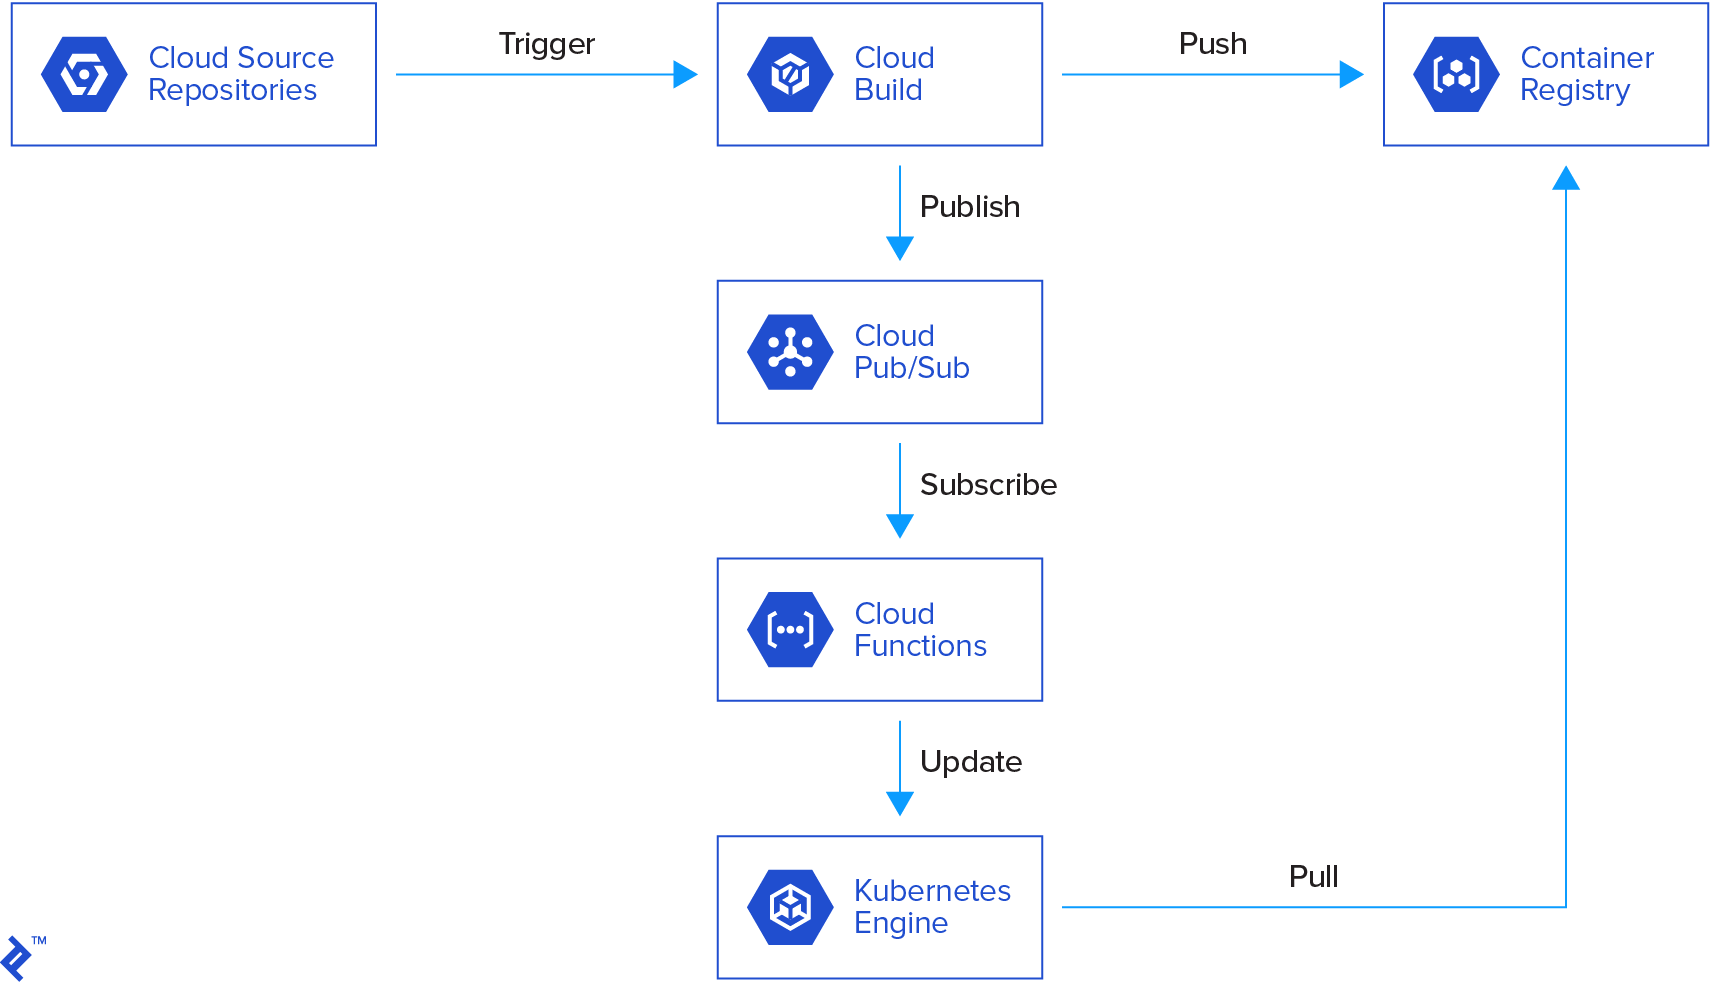
The flow is as follows:
- Someone commits to our repository.
- This triggers a cloud build which builds a Docker image based on the source repository.
- The cloud build pushes the image to the container repository and publishes a message to cloud pub/sub.
- This triggers a cloud function which checks the parameters of the published message (status of the build, name of the image built, etc.).
- If the parameters are good, the cloud function updates a Kubernetes deployment with the new image.
- Kubernetes deploys new containers with the new image.
Source Code
Our source code is a very simple Flask app that just serves some static text. Here is the structure of our project:
├── docker
│   ├── Dockerfile
│   └── uwsgi.ini
├── k8s
│   ├── deployment.yaml
│   └── service.yaml
├── LICENSE
├── Pipfile
├── Pipfile.lock
└── src
    └── main.py
The Docker directory contains everything needed to build the Docker image. The image is based off the uWSGI and Nginx image and just installs the dependencies and copies the app to the right path.
The k8s directory contains the Kubernetes configuration. It consists of one service and one deployment. The deployment starts one container based on the image built from Dockerfile. The service then starts a load balancer that has a public IP address and redirects to the app container(s).
Cloud Build
The cloud build configuration itself can be done through the cloud console or the Google Cloud command line. I chose to use the cloud console.
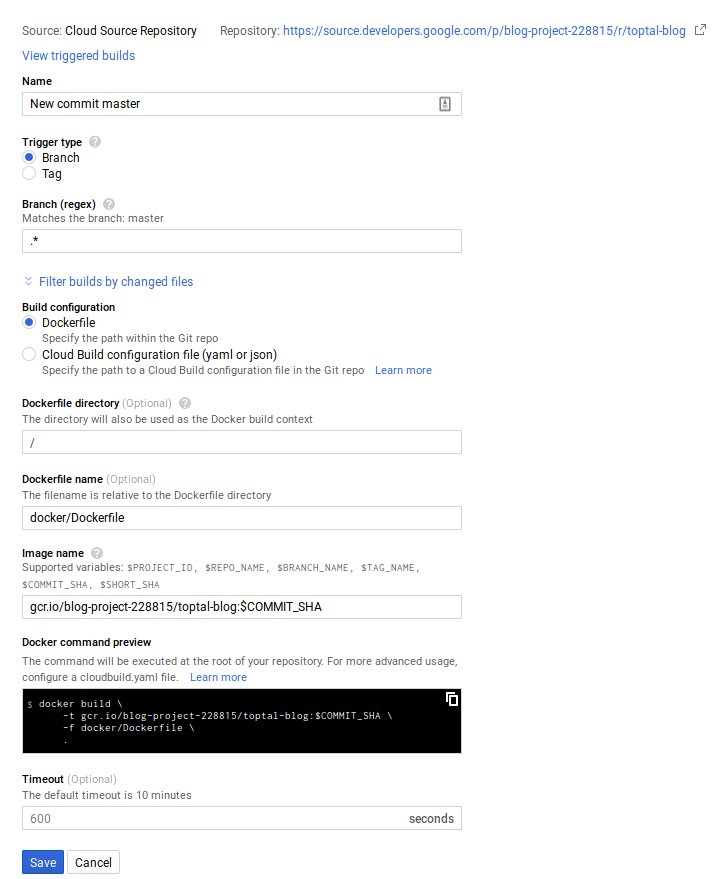
Here, we build an image for any commit on any branch, but you could have different images for dev and production, for instance.
If the build is successful, the cloud build will publish the image to the container registry on its own. It will then publish a message to the cloud-builds pub/sub topic.
The cloud build also publishes messages when a build is in progress and when one fails, so you could also have things react to those messages.
The documentation for the cloud build’s pub/sub notifications is here and the format of the message can be found here
Cloud Pub/Sub
If you look in your cloud pub/sub tab in the cloud console, you’ll see that the cloud build has created a topic called cloud builds. This is where the cloud build publishes its status updates.

Cloud Function
What we’ll do now is create a cloud function that gets triggered on any message published to the cloud-builds topic. Again, you can either use the cloud console or the Google Cloud command line utility. What I did in my case is that I use the cloud build to deploy the cloud function each time there is a change to it.
The source code for the cloud function is here.
Let’s first look at the code that deploys this cloud function:
steps:
- name: 'gcr.io/cloud-builders/gcloud'
  id: 'test'
  args: ['functions',
  'deploy',
  'new-image-trigger',
  '--runtime=python37',
  '--trigger-topic=cloud-builds',
  '--entry-point=onNewImage',
  '--region=us-east1',
  '--source=https://source.developers.google.com/projects/$PROJECT_ID/repos/$REPO_NAME']
Here, we use the Google Cloud Docker image. This allows to run GCcloud commands easily. What we’re executing is the equivalent of running the following command from a terminal directly:
gcloud functions deploy new-image-trigger --runtime=python37 --trigger-topic=cloud-builds --entry-point=onNewImage --region=us-east1 --source=https://source.developers.google.com/projects/$PROJECT_ID/repos/$REPO_NAME
We’re asking Google Cloud to deploy a new cloud function (or replace if a function by that name in that region already exists) that will use the Python 3.7 runtime and will be triggered by new messages in the cloud-builds topic. We also tell Google where to find the source code for that function (here PROJECT_ID and REPO_NAME are environment variables that get set by the build process). We also tell it what function to call as the entry point.
As a side note, in order for this to work, you need to give your cloudbuild service account both the “cloud functions developer” and “service account user” so that it can deploy the cloud function.
Here are some commented snippets of the cloud function code
The entrypoint data will contain the message received on the pub/sub topic.
def onNewImage(data, context):
The first step is to get the variables for that specific deployment from the environment (we defined those by modifying the cloud function in the cloud console.
    project = os.environ.get('PROJECT')
    zone = os.environ.get('ZONE')
    cluster = os.environ.get('CLUSTER')
    deployment = os.environ.get('DEPLOYMENT')
    deploy_image = os.environ.get('IMAGE')
    target_container = os.environ.get('CONTAINER')
We’ll skip the part where we check that the structure of the message is what we expect and we validate that the build was successful and produced one image artifact.
The next step is to make sure that the image that was built is the one we want to deploy.
    image = decoded_data['results']['images'][0]['name']

    image_basename = image.split('/')[-1].split(':')[0]
    if image_basename != deploy_image:
        logging.error(f'{image_basename} is different from {deploy_image}')
        return
Now, we get a Kubernetes client and retrieve the deployment that we want to modify
    v1 = get_kube_client(project, zone, cluster)
    dep = v1.read_namespaced_deployment(deployment, 'default')
    if dep is None:
        logging.error(f'There was no deployment named {deployment}')
        return
Finally, we patch the deployment with the new image; Kubernetes will take care of rolling it out.
    for i, container in enumerate(dep.spec.template.spec.containers):
        if container.name == target_container:
            dep.spec.template.spec.containers[i].image = image
    logging.info(f'Updating to {image}')
    v1.patch_namespaced_deployment(deployment, 'default', dep)
Conclusion
This is a very basic example of how I like things to be architected in a CD pipeline. You could have more steps just by changing what pub/sub event triggers what.
For instance, you could run a container that runs the tests inside the image and publishes an event on success and another one on failure and react to those by either updating a deployment or alerting depending on the outcome.
The pipeline we built is pretty simple, but you could write other cloud functions for other parts (for instance, a cloud function that would send an email to the developer that committed the code that broke your unit tests).
As you can see, our build environment cannot change anything in our Kubernetes cluster, and our deployment code (the cloud function) can’t modify the image that was built. Our privilege separation looks good, and we can sleep tight knowing that a rogue developer won’t bring down our production cluster. Also we can give our more ops-oriented developers access to the cloud function code so that they can fix or improve it.
If you have any questions, remarks, or improvements, feel free to reach out in the comments below.
Further Reading on the Toptal Blog:
Understanding the basics
What is the difference between continuous delivery and continuous deployment?
Continuous delivery is a practice that aims at being able to deliver stable software at any point in time. Continuous deployment takes this a step further and automatically deploys said software (usually in a software-as-a-service environment).
What is a deployment pipeline?
A deployment pipeline is the collection of software that allow the developer to go from an application’s source code to the application running in production. This usually includes software to build, test, and deploy the application.
What is the problem with traditional continuous deployment pipelines?
Most traditional continuous deployment pipelines rely on having all the information in the same place including the credentials to push the new artifact to production.
How do we make a better continuous deployment pipeline?
Ideally, all the different parts of your pipeline should be independent and should use some type of event mechanism to start a step when the previous one has succeeded.
Antoine Reversat
Montreal, QC, Canada
Member since September 10, 2018
About the author
Antoine is a software developer with more than 18 years of experience at companies such as Meta and Ubisoft. He has deep expertise in Linux systems administration, DevOps, and Python, and has developed CI/CD pipelines for several organizations.
Expertise
PREVIOUSLY AT